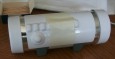
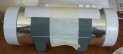
ASSEMBLING THE There are six parts to the Thermal Detonator: Top and bottom half of the cylinder, two end caps, cylinder control cover, and decals. The two cylinder halves will need to be sanded with 150 grit or higher sandpaper and then painted gray. Here are parts of the Thermal Detonator in construction stage. The two smaller peices are for the helmet. They are shown here as these pieces were all painted the same color and at the same time. Apply decals to both ends of the cylinder. Make sure to work out any wrinkles or bubles as you apply the decals. Align up the edge of the decal to the edge of the cylinder. Also make sure the end of the decal stops near the backside of the cylinder that will be up against the trooper belt. Place Abs cement around the inside perimeter of the end cap making sure not to go to high up to the edges. If you go up to high you take a chance of squeezing out the excess cement onto the outside of the cylinder. Looking into the Thermal Detonator. The end cap you can see is ABS cemented into place. The other side is left unglued. This was done intentionally so that I can use the cylinder to store keys, credit cards, money, eye drops, etc. Put the other end cap on (do not ABS cement it, just press it into place) to set up for the final fitting of the center control panel. This will allow you to center the control panel and ABS cement it into place. Also align the control plate so that it covers the cylinder seperations. Most of the control plate should cover the top half of the cylinder but come down low enough to cover the seperation. ABS cement the control plate. Use masking tape to help hold it in place. Again be careful how much ABS cement you apply as you do not want it to squeeze out past the control plate edges onto the cylinder. Bottom view of the Thermal Detonator.
THERMAL DETONATOR
Once the paint is dry, align the two cylinder halves and tape them together. If you have uneven ends you can cut them and file them down for a better alignment. But it really is not necessary since the end caps will cover it up. Now, apply the ABS cement using a long thin stick (I used wooden skewers) to get inside of the cylinder. Let cure enough to continue to next step.
Once the end cap is cemented and in place, you will want to add more ABS cement to the inside edges in order to get the end cap secure enough to stay in place. Use a long thin stick to get the ABS cement down into the cylinder to reach the end cap.
Another reason for not ABS cementing the other end cap is you will need to get inside of the cylinder in order to secure it to the Stormtrooper BELT.
If you find that the not ABS cemented end cap does not want to stay in place, you can add a layer of electrical tape around the inside perimeter of the end cap. This will give the added material to ensure a tight sealed fit. You may have to experiment on what amount of layers you will need. It may be as little as going half way around the perimeter to as much as two layers. Also, be aware how the tape is applied so that you do not push the tape into the end cap when trying to place it on the end of the cylinder.