ASSEMBLING THE UPPER ARMOR

The upper armor includes the chest plate, back plate, connecting bridges, shoulder armor, and biceps. ABS cement was used to permanently connect the chest plate and back plate with the connecting bridges. The bicep halves are also ABS cemented together. There are now five pieces to the upper armor: chest/back plate, 2 x shoulder armor, and 2 x bicep. All of these are connected together with elastic stretch fabric and snaps.

To install snaps into the armor and keep them hidden, use the shim pieces, cut out 3/4 inch wide strips and cut to proper length for each of the used locations: 2 x connecting bridges, 2 x shoulder armor, 2 x bicep.
Take the measurement from the 3/4 inch width and drill a hole for the female snap to be installed in the shim strip. Use the snap pliers to install the female snap. Position the shim strip with snap installed onto the locations listed above and shown in the holo-photos below. ABS cement the shim strips and secure in place while ABS cement cures.

Once all of the shims are cemented in place, determine the length of the elastic fabric is needed for the securing the shoulder armor and bicep to the connecting bridge. Insert male snaps into fabric at these points.
To prevent the shoulder armor from flopping around, use a shim strip (without snap). Determine how high up the bicep armor will go into the shoulder armor while wearing it. Mark this height on the inside of the shoulder armor. ABS cement the shim strip across the ridge line channel above the mark. Secure the strip in place while the ABS cement cures. Use the elastic fabric with snaps installed and push the end with the snap going to the bicep down through the gap behind the shim strip. Secure the snap to the bicep armor, the middle snap to the shoulder armor and finally the top snap to the connecting bridge.

In order for me to wear the armor, I just slip the chest/back plate over my head and then pull bicep/shoulder armor piece up each arm and secure snap to the connecting bridge.

Chest Plate

Chest Plate

Back Plate

Back Plate

Connecting Bridge and velcro

The Chest Plate and Back Plate are connected with the Connecting Bridges. The elastic fabric with velcro sewn in attaches the Chest Plate to Back Plate on both sides. It fastens to the Armor Plates with white hook velcro and is mounted as high up the armor just below the arm opening.

Securing snap shim

The Shim Strip with female snap is placed under each Connecting bridge and ABS cemented into place. It is held with a clamp while the cement cures. The plastic clamp is actually a fuel line hose clamp which was purchased at the local automotive store.

Another secure Snap shot (ha ha)

Two clamps are used to secure the Shim Strip and masking tape is placed over the finished side of the armor before clamping to protect it from the clamp.

Close up of finished snap

A close up of the finished Shim Strip with female snap in place. Notice that the length of the shim is cut to fit in the gap between the Chest Plate and the Back Plate.

Both Snaps

A view of both Shim Strips in place. Notice that they are different lengths. The distants between the Chest Plate and the Back Plate is going to be determined by individual fitting.
When first putting it together, use masking tape to hold the Connecting Bridges to the Chest Plate and Back Plate to determine the best fit while wearing it. Then, once the fit is good, ABS cement the Connecting Bridges to the Chest Plate first and wait for it to cure before moving on to ABS cementing it to the Back Plate.

Snap close up

Shoulder Armor

Snap inside Shoulder Armor

Another Shim Strip with female snap is placed just below the top of the Shoulder Armor, ABS cemented in place and secured with two clamps. Again masking tape is used to protect the finished side of the armor from the plastic clamp.
Not shown here, but in three holo-photos shown lower down the page is the Shim Strip ABS cemented across the ridge line channel that will prevent the Shoulder Armor from flopping outward.

Finished Bicep Armor

The Bicep Armor was ABS cemented together and overlap was trimmed off at the top. A Shim Strip with female snap was also ABS cemented into place just below the inside top.

Elastic Fabric with snaps

An unfinished elastic fabric with male snaps inserted. Note the black loop velcro is placed on the fabric and is being used to measure the height of the Bicep Armor into the Shoulder Armor.

Completed Upper Arm

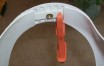
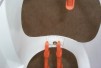
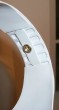
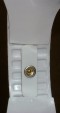
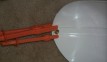
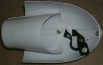
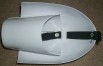
Here is the completed upper arm with elastic fabric with male snaps inserted in three places to secure to the Bicep Armor, the Shoulder Armor and to the Connecting Bridge. The elastic fabric is pulled through the gap under the Shim Strip in the ridge line channel, then connected to the Bicep Armor snap.

Shim Strip View

Credit goes to OBI-WAN'S JEDI ACADEMY for the idea of the Shim Strip in the Shoulder Armor.

Snap and Shim Strip View

The elastic fabric snaps have been unfastened to show the placement of the snaps on the armor and on the elastic fabric.

Finished Upper Armor

Here is the finished Upper Armor with the upper arm armor attached to the Connecting Bridges.

BACK